How to Create a Mood Board for Your Next Room Makeover
Every stunning room you see in magazines or design portfolios started with a vision—and that vision was likely captured in a mood board. Whether you’re planning a full renovation or simply refreshing your living room, a mood board is your best friend.
Introduction
Every stunning room you see in magazines or design portfolios started with a vision—and that vision was likely captured in a mood board. Whether you’re planning a full renovation or simply refreshing your living room, a mood board is your best friend. It brings your ideas together, keeps your style consistent, and helps you visualize how everything will look before you commit.
In this blog, we’ll break down the step-by-step process of creating a mood board, what to include, and how it can turn your decorating ideas into a clear and cohesive design plan.
1. What Is a Mood Board in Interior Design?
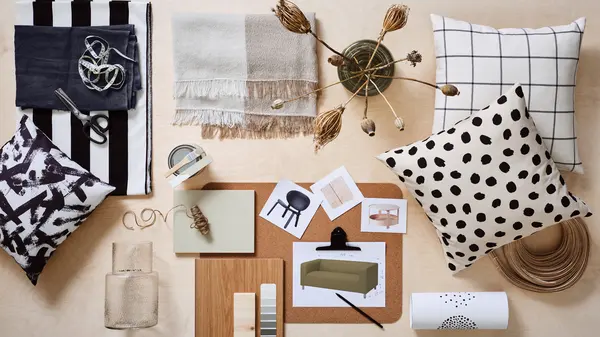
A mood board is a visual collage of colors, materials, furniture, textures, and inspiration images that represent the overall aesthetic and feel of a space. Think of it as a design blueprint—it helps you:
- Clarify your vision
- Stay on track with purchases
- Share your ideas with others (like a partner or contractor)
- Avoid mismatched elements or impulse decisions
Whether digital or physical, mood boards translate abstract ideas into tangible visuals.
2. Define Your Room’s Purpose and Mood
Before collecting images, get clear on two key things:
- Function: What activities will happen in this room? (e.g., relaxing, working, dining)
- Feel: How do you want the space to feel? (e.g., cozy, airy, energizing, minimalist)
For example, a bedroom should feel restful and serene, while a dining room may be bold and sociable. Defining your desired mood early will help guide your design direction.
3. Choose Your Color Palette
Color is the backbone of any mood board. Select a palette that reflects the mood you want to create. Aim for:
- 1–2 main colors
- 2–3 supporting tones or neutrals
- Optional accent colors for contrast or pop
If you’re unsure where to start, try using inspiration from:
- Nature (beach tones, forest hues)
- A favorite piece of art
- A fabric, rug, or tile you love
Use tools like Adobe Color, Canva, or Pinterest to experiment and visualize combinations.
4. Gather Visual Inspiration
Now the fun begins! Start collecting visuals that match your room’s purpose, mood, and palette.
Include:
- Furniture styles (sofas, chairs, tables)
- Flooring and wall finishes
- Lighting options
- Textiles (curtains, cushions, rugs)
- Decor accessories (vases, art, books)
- Inspiration images from magazines, Pinterest, or Instagram
Don’t worry about perfection—just pull anything that aligns with your overall vision.
5. Add Texture and Material Samples
Texture plays a major role in how a space feels. A strong mood board includes:
- Swatches of fabric (linen, velvet, wool)
- Finishes like wood, metal, stone, or tile
- Photos or samples of flooring, paint, or wall treatments
If you’re working digitally, look for high-resolution material images. If you're creating a physical board, gather real samples from hardware stores or fabric shops.
6. Decide on a Format: Digital vs. Physical
You can create your mood board in two formats:
Digital Tools:
- Canva
- Milanote
- Adobe Illustrator or InDesign
- Pinterest (for gathering, then refine into a board)
Physical Boards:
- Poster board or corkboard
- Magazine clippings, paint chips, printed photos
- Fabric swatches, tile pieces, material samples
Choose whichever method feels natural to you—both work equally well.
7. Curate and Edit for Clarity
A mood board is not a shopping list—it’s a visual story. Once you’ve gathered enough material, step back and edit:
- Remove anything that feels off-theme or too similar
- Ensure every image supports the mood and palette
- Look for visual balance (don’t overload one color or style)
The goal is to create a board that clearly communicates the essence of your future room in one glance.
8. Add Notes and Labels (Optional)
If you're sharing your mood board with others or using it as a working guide, you can:
- Label color swatches with paint codes
- Add dimensions or specs to furniture items
- Include short notes on why you chose certain elements
This helps with purchasing decisions and keeps everyone aligned on the vision.
9. Use It as a Design Guide
Once your board is complete, refer to it throughout your project. It will help you:
- Evaluate potential purchases
- Select finishes or materials
- Style accessories and decor
- Stay focused and avoid style drift
When every decision relates back to the mood board, the final room feels unified and intentional.
10. Let It Evolve Over Time
Mood boards aren’t set in stone. As you shop, explore, and refine your ideas, you may find that certain colors or pieces shift.
That’s completely normal. Use your mood board as a flexible foundation—a creative direction rather than a strict rulebook.
Conclusion
A mood board is one of the most powerful tools in the interior design process. It turns scattered inspiration into a focused vision, helping you create rooms that are not just beautiful—but also balanced, functional, and true to your style.
Whether you’re revamping one room or reimagining your entire home, let your mood board lead the way. It’s where creativity meets clarity—and where your dream space begins to take shape.
Recent Blogs
-

How to Choose the Best Luxury Watches 2026 Without Overpaying
-

Tesla Cybertruck vs Traditional Trucks: What Actually Matters Before You Buy
-

How to Choose a Fat Loss Program That Actually Works (Without Burning Out)
-

Upgrade Your Watch Style With Premium Strap Choices
-

How Reducing Stress Naturally Improves Your Daily Health Habits